
Usage & Instructions
Planning to Sell the Poultry You Process?
Processing poultry for sale in Washington State requires the appropriate license. Here are some handy links for more information:
- Selling and Processing Poultry (overview – start here)
- Handbook for Special Poultry Permit (for 1,000 birds/ yr. or fewer)
- Food Processor License information (for more than 1,000 birds/ yr.)
Processing Equipment
- Featherman Equipment Processing Tutorial Videos [NOTE: we suggest you also read the lighting instructions below – Feathermans’ video shows use of an ignitor button which is a discontinued feature. Scalders are now lit manually as discussed below.]
Usage Instructions and Tips
If any of the equipment is malfunctioning or broken, discontinue use and contact our office. Do not alter the equipment in any way – you may create a hazardous condition. Please feel free to call NABC 8AM-4:30PM, M-F if you have any questions: 360-336-3727.
Scalder Instructions Requires propane tank and grounded (3-prong) 110 power outlet. READ CAREFULLY.
- Before adding water, tip the scalder up to view the bottom of the unit. Note the location of the pilot light – unlike a BBQ with an electronic ignition, you’ll be lighting the pilot directly (similar to a propane water heater).
- Setting the unit on the ground, attach the provided hose and regulator to your propane tank; turn on the tank.. Some tanks come equipped with a safety valve – if yours does, listen for the click when it is fully opened.
- Next, fill the scalder 2/3 to 3/4 with water. Be sure the water level is high enough to cover the holes that lead to the Aquatstat (TIP: If you are processing next to your house consider directly filling the tank from your hot water heater to get a jump start).
- Identify the plastic PILOT knob on the gas valve (usually tan or grey). Turn the knob to the PILOT position as indicated by the small metal bump. Push the knob in and hold for 1 minute.
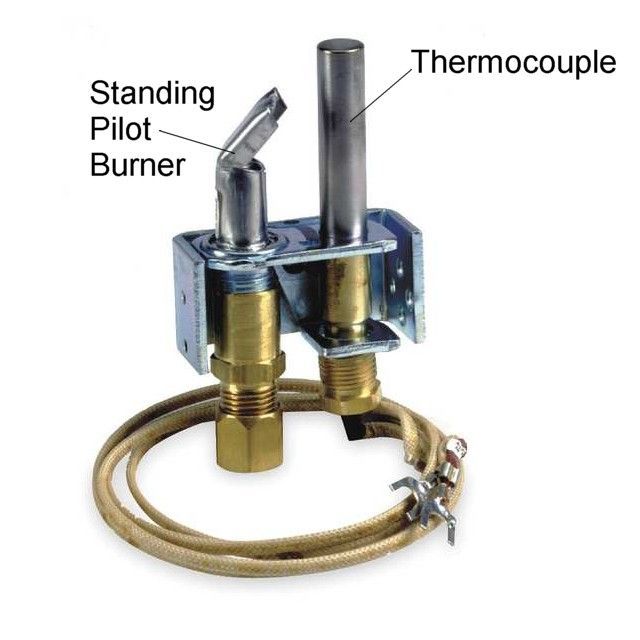
- WHILE CONTINUING TO HOLD THE KNOB IN, reach underneath the unit and light the pilot light directly with a wand-style lighter. ONCE THE :PILOT IS LIT, continue to hold the knob in for another 30 seconds to warm up the thermocouple. Now plug in the Aquatstat thermostat (be sure the cord does not pass under the scalder!). Help the thermocouple to reach operating temperature by warming it with the lighter flame for 10-20 seconds. See typical thermocouple and pilot flame set up in photo at right. Do not plug in the Aquastat until after the pilot flame is lit.
- Finally, turn the knob to the ON position – the burner ring underneath the unit should light up. If not – repeat! (TIP: If you are in a windy location, partially block off the bottom so the pilot light does not blow out during your processing. Check it from time to time to make sure it is still lit.)
USE COMMON SENSE: PROPANE IS A HIGHLY FLAMMABLE GAS. If repeating the lighting process, BE SURE TO UNPLUG THE AQUASTAT BEFORE ATTEMPTING TO LIGHT THE PILOT LIGHT. Excess release of propane during repeated attempts to light the pilot light may result in a build-up of propane underneath the scalder tank. Failure to unplug the Aquastat before re-attempting may create a hazardous condition (spark vs. propane). IF YOU DETECT A STRONG PROPANE SMELL, DO NOT ATTEMPT LIGHTING. Air it out underneath THOROUGHLY before resuming attempts to light the pilot tin order to avoid sudden ignition of the built-up propane. - Allow 1.5 to 2 hours for the water to reach scalding temperature at around 147 degrees (it will cycle between 145-150). (TIP: Use a meat thermometer to check the temperature so you know when its ready. Place plywood or other cover on the unit to retain heat and speed up the process.)
Dunker Instructions Document »
See Featherman’s video for assembly; third row down, far left. (TIP: By setting your plucker and scalder next to each other, you will be able to simply swing your scalded birds over to the plucker, unclip them from the ducker, and drop them straight into the plucker drum.)
Plucker Instructions Document »
Requires grounded 110 power outlet and a garden hose connected to a water source.
Once your birds are scalded, place about 3 chickens at a time in the plucker, turn on the Y-valve so water is pouring in, and turn on the unit with the toggle switch located on the grey base. Expect your birds to be plucked in 20-30 seconds. (TIP: Try setting up a strainer under the outflow chute to catch the feathers and save clean-up time. Keep pliers handy to pull out any remaining pin feathers)
Kill Cone Stand and Cone Installation Instructions:
The stand is a 3-piece unit: (base, frame, and cone carousel. The black plastic base also acts as a blood trough.
- Set the tripod frame into the holes in the base.
- Slide the cubed-shaped cone carousel over the tip of the tripod frame’s center rod.
- Mount the cones on the hooks around the edge of the carousel. (TIP #1: As you bleed out each bird, rotate the carousel to the next bird – fewer steps = reduced processing time. TIP # 2: Spray cones, frame, and base with vegetable oil – blood sticks to everything like glue; this step will save you time during clean-up.)
Before returning the equipment, please hand-pick as many feathers as possible out from under the plucker fingers (no real short-cuts for this), and scrub everything down with a scrub brush and dish soap. Please leave the equipment in the condition you’d want it in for your own use. (TIP: Use Dawn – it cuts through the fat residues effectively).